Hola a todos somos los alumnos de 5º A del Colegio San Gregorio, en Aguilar de Campoo y con este vídeo queremos mostraros nuestro trabajo y desearos a todos FELIZ NAVIDAD! Esperamos sean una fechas de compartir con vuestros seres queridos y cargar de ilusión nuestras vidas para afrontar el año nuevo que comenzamos.
jueves, 18 de diciembre de 2014
martes, 16 de diciembre de 2014
REVISTA DETALLES, Primer Trimestre curso 2014/2015
Buenos días a todos,
Aquí está el siguiente número de nuestra revista del Colegio San Gregorio en Aguilar de Campoo. Es la revista Detalles y una vez al trimestre tratamos de contar al resto lo que hemos ido realizando en nuestras aulas. Esperemos que os guste.
lunes, 15 de diciembre de 2014
Evaluación Primer Trimestre en 5º, Curso 2014/2015
El trimestre toca a su fin y llega el momento de tomarnos unos días de relax y de compartir con la familia. Ha sido un trimestre duro donde hemos trabajado mucho, hemos conocido a nuevos profesores, nuevas formas de trabajar en clase, etc... Y otras muchas cosas que hayáis vivido durante este trimestre y que tenéis en vuestras cabezas.
Ahora toca evaluar, toca ver lo positivo de este trimestre y aquello que quizás tenemos que hacer de forma diferente para los próximos trimestres. Y para eso necesitamos de vuestra ayuda.
La evaluación y la oportunidad de expresar vuestra opinión lo vamos a hacer a través de una rutina de pensamiento 3 x 1 que ya hemos realizado en más ocasiones, recuerda son tres aspectos positivos y uno para mejorar.
Recuerda dos cosas importantes:
- Tú opinión es importante por lo tanto no hagas esto a la carrera. Tómate tu tiempo para pensarlo y reflexionar.
- Cuando termines tendrás que pinchar en SUBMIT o ENVIAR para que tu opinión quede registrada.
sábado, 13 de diciembre de 2014
VIII Congreso TICC - Escuelas Católicas Castilla y León (Panel de Certificación TIC)
Hoy 13 de diciembre de 2014 tengo la suerte de junto a mi compañero Julián Sanz Mamolar participaremos en el Panel sobre la Certificación TIC en el VIII Congreso TICC de Escuelas Católicas Castilla y León . En el mismo hablaremos sobre cómo en nuestro colegio: Colegio San Gregorio en Aguilar de Campoo, hemos trabajado hasta la obtención de la Certificación TIC Nivel 5
En el mismo tomaremos parte tres colegios:
En la siguiente presentación podréis ver nuestra exposición durante el panel de experiencias:
viernes, 12 de diciembre de 2014
PLANT REPRODUCTION (Science Year 5, Unit 2)
Last day we were talking about PLANT NUTRITION. We are going to review today using one of our THINKING ROUTINES: QUICK WRITE / QUICK DRAW. Remember to draw and write as faster as you can with the ideas you had about last day lesson.
Today we are going to learn a bit more about how do plants reproduce. This STOPMOTION video will help you to understand.
- At the end of the video you have to answer these following questions.
- What is it needed for POLLINATION?
- Do you think that just the bees can help with transportation?
SEXUAL REPRODUCTION
- Flowers are the reproductive organs of the plant.
- The stamen are the male. They produce polen.
- The ovary is the female part. It produces ovules which becomes seeds.

POLLINATION
- Tiny pollen grains form on the stamens.
- POLLINATION is teh movement of pollen from stamens to ovary.
- It used to take place in the same plant.
- Wind and insects also carry plant to other plants.


SEEDS AND FRUITS
- After pollination the flower changes.
- Petals fall and ovary grows. It becomes a fruit with seeds.
- The fruit is ripe, it falls to the ground and the seeds fall out.
- The seeds germinate: they open, and small roots and tiny leaves grow.

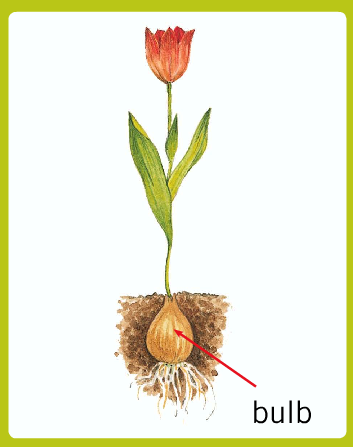
ASEXUAL REPRODUCTION
- Some plants reproduce without flowers or seeds:
- TUBERS: they are underground stems. It develops roots and a stem rise above the ground. For example he potato.
- BULBS: they also grow underground. For example onions
- STOLONS: These are stems which extend acroos the ground. Roots grop an a new plant begins. For example strawberries.


LET'S PRACTISE ALL WHAT YOU HAVE LEARN DURING THIS TOPIC WITH THE FOLLOWING ACTIVITIES.
martes, 9 de diciembre de 2014
PLANT NUTRITION (Science Year5, Unit 2)
Try to review what we have learnt about plants the last lesson. We are goint to use a THINKING ROUTINE: THINK-PAIR-SHARE. Think: three ideas about the last lesson, PAIR: talk about these three ideas to your partner, SHARE: we will talk with all the class so we can create a small mind map about it.
LET'S HAVE A LOOK TO THIS VIDEO TO START WITH THE TOPIC:
- At the end of the video you have to create a picture in your notebook in which you represent the process of PHOTOSYNTHESIS.
RESPIRATION:
- Plants breathe.
- They take oxygen and release carbon dioxide.
- It takes place in leave continually, day and night.

PLANT NUTRITION:
- Plants are autotrophs: they make their own food.
- They need sunlight, carbon dioxide, water and mineral from the soil.

WATER AND MINERALS
- They are importann for plant nutrition.
- In the soil minerals are dissolved in water.
- Plants absorved water through the roots.
- RAW SAP: The nutrients travel up from the stem to the leaves.

PHOTOSYNTHESIS
- It enables plant to make food using sunligth, carbon dioxide, water and minerals.
- It takes place in the lives.
- In the leaves raw sap mix with carbon dioxide and becomes ELABORATED SAP.
- ELABORATED SAP is the food for the plant.
- Sunlight is very important for the photosynthesis so it only takes place during the day.
- During this process the plants release oxygen.

LET'S PRACTICE ALL WHAT YOU HAVE LEARN PLAYING THIS GAME
PLANTS (Unit 2, Year 5)
Today we will start with a new topic during our Science Lessons. During a couple of weeks we will talk about PLANTS. First of all it would be good to start with a THINKING ROUTINE: THE TRAFFIC LIGHTS, we will use this to check what you remember or know about plants.

We can watch a video to introduce the topic. Please during the video we will deal with a new THINKING ROUTINE: HOT WORDS, write down in your notebook important words (just words) about the video.
PLANT GROUPS
Plants have roots, stem and leaves.
- ROOTS: they are in the soil. They absorbed from the soil through the roots.
- STEM: it supports the leaves. It transports water and nutrients to the leaves.
- LEAVES: They are used to breathe and make plant's food.

FLOWERING PLANTS
It is the biggest group of plants.
- GYMNOSPERMS:

- Small flowers, but no fruit.
- Seed are together in a small cone.
- Most of them are tree: Pine trees.
- ANGIOSPERMS:
- They have flowers
- They have fruit.
- Chessnut trees.
NON-FLOWERING PLANTS
It is the smallest group of plants. They need shade and moisture.
- MOSSES:
- Small plants.
- They live on rocks, trees and ground.
- FERNS:
- They are larger mosses.
- They have thick, underground stems and big leaves.


LET'S PRACTISE WITH THIS CROSSWORD
martes, 2 de diciembre de 2014
An e-Twinning Actívity: History about Aguilar de Campoo
Helo everybody, with this activity we will start an e-Twinning project with another two european schools:

- Holy Trinity Pewly Down School. (Guildford, England)
- Zespol Szkolno-Przedszkolny nr 3 im. Jana Pawla II. Rybnick, Poland.
With this project we will create a Touristic Guide about out towns. We will create a touristic guide about our different towns:
This first activity will be around the history of our towns. You will need three things to do this actívity:
- Grammar: The past tense.
Videos to explain grammar (Past tense)
- Information about history of Aguilar de Campoo. Here you have a couple of websites to look for it:
- The tool to create a timeline to post into the website. We will use Line.do
This is a tutorial about the tool, please read it before starting.
RÚBRIC FOR THE EVALUATION
lunes, 1 de diciembre de 2014
Evaluación Semana Juan María 2014 (24-30 de Noviembre)
Mediante estos dos cuestionarios queremos saber tu opinión acerca de la semana de Juan María 2014 que hemos celebrado durante la semana pasada. Tómate tu tiempo para contestar recuerda que tu opinión es importante para que podamos mejorar.


ENCUESTA
CRÍTICA 3 X 1
Recuerda reflejar esto último en tu cuaderno de pensamiento me-NOTE
Recuerda reflejar esto último en tu cuaderno de pensamiento me-NOTE
lunes, 10 de noviembre de 2014
Técnicas de Estudio (II). Tutoría 10 / 11 / 2014
Continuamos en esta tutoría con el tema de la semana pasada: LAS TÉCNICAS DE ESTUDIO. Ya que consideramos que es un tema importante y que nos ayudará a enfrentarnos con mayor confianza a nuestro trabajo y estudio diario.
La semana pasada trabajábamos a través de este post del blog y conseguimos realizar nuestro horario de estudio.
Revisa tú semana ¿Has llevado a cabo este horario de estudio?
Hoy queremos trabajar Técnicas más concretas que te ayuden a acercarte a la materia, a comprenderla e interiorizarla. En este vídeo nos explican muchas cosas pero:
¿CUÁLES SON LAS TÉCNICAS QUE NOS AYUDAN
A ESTUDIAR EL TEMARIO?
Mira el vídeo y danos una respuesta al final del mismo.
Vamos a ver cuál es el proceso que hemos de seguir desde que tenemos el texto hasta que lo memorizamos. ¿Qué técnicas podemos utilizar y cómo son?
Lo vamos a trabajar a través de la RUTINA DE PENSAMIENTO: Think - Pair - Square
Think: Piensa individualmente acerca de las técnicas a utilizar y cómo utilizarlas.
Pair: Comenta con tu compañero y contrasta las ideas. Incorpora aquello nuevo que tu compañero tenga.
Square: Juntando las ideas de todos. Habéis de elaborar un compendio que comentaréis a todo la clase.
Apoyándonos en unos materiales del Colegio de los Trinitarios de Córdoba y facilitados por la web Orientación Andújar.

Vemos que el proceso sería:
1º LECTURA
2º SUBRAYADO
3º RESÚMEN
4º ESQUEMA
5º MAPA CONCEPTUAL
Junto con el tutor vas a intentar profundizar un poco más en cada una de ellas.
A PARTIR DE AQUÍ TAN SÓLO QUEDA QUE LAS PONGAS EN USO.
viernes, 7 de noviembre de 2014
How to write and publish a post in our DIGITAL PORTFOLIO (Kidblog)
To begin you have to go to the blog and LOG IN with your user name and password. Here you have the last post we did about it.

Once you are in your personal kidblog account. You have to look for NEW POST to start working.

The first thing you have to do is choose and write the title fo the post, normally we will use the one which the teachers have given you as the title of the activity. But don't hesitate to be as more creative as posible.

The next step you will find it would be a square in which you will write the body of your post, I mean, what you really want to tell us in this post. To deal with this part is very easy because it has the same functions as it was a text processor (Underline, bold, centred text, kind of letter...). In this body for writing we should follow this pattern:
- Greeting
- Explanation of the activity. What is the activity about?
- The activity (Embed the HTML, picture, etc...)
- Farewell.

In many occassions the post will include a Google Drive presentation, or some YouTube videos, etc. These are elements which are embed in our post through an computer programming language: It is called HTML. We will explain you how to look for this code later, because each website has a concrete way of doing it. By the moment we want to show you how to introduce in a post.
- Copy the HTML code from the original website (Google Drive, You Tube, etc...)
- You have to put your pos in HTML mode by clicking in the convenient tab (let's have a llok to the following picture).
- Paste the HTML code in the correct place in which we want it to take up. e
- Let's go back to the normal view of the post (Visual tab) and check if everything is ok.


If we want to add and upload a picture in our post we will do it by clicking in UPLOAD/INSERT MEDIA

The last thing we have to do before publishing our post it will be to write the TAGS. (It will help us to organize the information we are offering and it will make easier the later search). The tags will be separated by commas and following by a space.
The TAGS will be the same for all the students. And there will be some which are the same in all the activities:
- colsangregorio.
- RedXXI
And there will be other TAGS which will change depending on the activity.
- English / Science (Depending on the subject of the activity)
- Title of the activity (For the first one it will be: My first presentation).

Finally we just have to publish it for everybody to read and see. First we will click on PREVIEW and we will be able to check that everything is correct and then we will click on PUBLISH.


Sometimes you may stop and you haven't finished the post so we will save it as a draft by clicking SAVE DRAFT.

If you want to recover this post that you have saved as a draft first you have to click on our name to go to our account and once you are in your account we will click on REVIEW POSTS

Let's click on the title of the post you want to publish and it will be opened as at the beggining, so click on PUBLISH.

jueves, 6 de noviembre de 2014
Rutina de Pensamiento: Salida Micológica (05/11/14)
Ayer disfrutamos de un gran día todos juntos y pudimos ver lo que estamos aprendiendo a través de nuestro proyecto: "I want to be a good mycologist".
Por la mañana disfrutamos con tres grandes micólogos de la Asociación "Corro de Brujas", ellos eran Javi, Adolfo y Jóse. Y nos hicieron disfrutar de un paseo por el monte donde fuimos aplicando muchas de las cosas aprendidas en el proyecto y donde descubrimos otras que nos queda por aprender.


Por la tarde pudimos conocer algo más de la historia de nuestra provincia y nuestros antepasados de la mano de Ana en la visita a la "Villa Romana de la Olmeda".

Y así hemos contado nuestra salida en Twitter:
Ahora llega el momento de descubrir y reflexionar sobre lo aprendido y queremos que lo hagas a través de una RUTINA DE PENSAMIENTO: 3, 2, 1 SALIDA MICOLÓGICA. La siguiente rutina la realizarás en el Me-note y después lo pasarás a este cuestionario anónimo para que nosotros podamos ver cómo ha ido todo en general.
Durante 5 minutos tendrás que pensar y escribir:
- 3 cosas aprendidas durante la visita de ayer.
- 2 cosas que consideras positivas de la visita de ayer.
- 1 cosa que crees tenemos que mejorar en la salida micológica.
lunes, 3 de noviembre de 2014
Técnicas de Estudio. Tutoría 03 / 11 / 2014
Hoy vamos a trabajar la técnicas de estudio. Vamos a comenzar viendo un vídeo acerca del tema. Os invito que realicemos una RUTINA DE PENSAMIENTO: QUICK WRITE / QUICK DRAW.
A través de esta presentación vamos a intentar descubrir ciertos hábitos que nos puedan ayudar a mejorar el estudio y el tiempo que nos dedicamos a estudiar.
viernes, 24 de octubre de 2014
My First Presentation (Year 5)
MY FIRST PRESENTATION
OBJETIVOS DE LA TAREA (Siguiendo Currículo Educación Primaria
Castilla y León - ORDEN EDU/519/2014 de 17 de junio):
Al final de esta tarea el alumno será capaz
de:
- Distinguir la función o funciones comunicativas
principales del texto (por ejemplo, una demanda de información a través de
preguntas) y un repertorio limitado de sus exponentes más habituales, así
como los patrones discursivos básicos (la descripción de un lugar).
- Conocer y saber aplicar las estrategias básicas
para producir textos orales monológicos o dialógicos muy breves y
sencillos, utilizando, por ejemplo, fórmulas y lenguaje prefabricado o
expresiones memorizadas, o apoyando con gestos lo que se quiere expresar
(Do you...?)
- Participar de manera simple y comprensible en
conversaciones muy breves que requieran un intercambio directo de
información en áreas de necesidad inmediata o sobre temas muy familiares
(lugares de procedencia), en un registro neutro o informal, utilizando
expresiones y frases sencillas y de uso muy frecuente, normalmente
aisladas o enlazadas con conectores básicos, aunque en ocasiones la
pronunciación no sea muy clara, sean evidentes las pausas y titubeos y sea
necesaria la repetición, paráfrasis y la cooperación del interlocutor para
mantener la comunicación.
- Interactuar de manera muy básica, utilizando
técnicas muy simples, lingüísticas o no verbales para iniciar, mantener o
concluir una breve conversación.
ESTÁNDARES EVALUABLES.
- Responde adecuadamente en situaciones de
comunicación (saludo, preguntas sencillas sobre sí mismo, petición u
ofrecimiento de objetos, de lo que está haciendo, del lugar donde está
situado algo, etcétera).
- Participa en conversaciones, cara a cara o por
medios técnicos (teléfono, videoconferencia), en las que se establece un
pequeño contacto social (dar las gracias,saludar, despedirse, dirigirse a
alguien, pedir disculpas, presentarse, interesarse por el estado de
alguien, felicitar a alguien), se intercambia información personal y sobre
asuntos cotidianos, se ofrece algo a alguien, se dan instrucciones (por
ejemplo, cómo se llega a un sitio con la ayuda de un plano).
- Escribe, en papel o en soporte electrónico, textos
breves de carácter narrativo e informativo sobre temas trabajados
previamente, basándose en un modelo y reproduciendo estructuras
trabajadas.
ENFOQUE COMPETENCIAL
- Competencia en Comunicación Lingüística:
- El alumno será capaz de:
- Escribir un texto descriptivo basándose en la
imagen ofrecida.
- Utilizar los códigos de comunicación para
conversar solicitando información.
- Competencia Digital:
- El alumno será capaz de:
- Dominar y aplicar a diferentes situaciones y
contextos diferentes lenguajes: visual, icónico, textual, gráfico,
etc...
- Generar producciones serias, responsables y
creativas.
- Comenzar a identificar a identificar estrategias
a utilizar para resolver situaciones y problemas con el software y el
hardware utilizado.
- Conciencia y expresiones culturales:
- El alumno será capaz de:
- Apreciar el hecho cultural y artístico.
- Aprender a Aprender:
- El alumno será capaz de:
- Organizar el trabajo planteándose metas a corto,
medio y largo plazo.
- Plantear actividades y organizar los tiempos.
- Sentido de iniciativa y espíritu emprendedor.
- El alumno será capaz de:
- Tener una actitud positiva al cambio.
To review unit 1 you are going to make your first presentation in DRIVE.


Below you will find all the instructions.

- Describe (eight sentences) the Van Gogh's BEDROOM using the PREPOSITIONS and the Grammar ticket on the AB page 5:
- Prepositions: behind, in, next to, under, between, in front of, on.
- There is / There are
- Make ten questions to the INTERVIEW. (Show the teacher the script which will be used)
- Using the grammar ticket on the AB page 7. Present simple questions.
- Remember you don't repeat the main verbs.
- Make a script to interview your partner.
- Write a composition of your partner using the grammar ticket on the page 8.
- Using the interview's answers.
- Ten sentences using Presente simple 3rd person singular
- Make a DRIVE presentation with five slides:
- Cover page with the title, your name, your classroom and your school.
- Van Gogh's bedroom picture and its description.
- Your interview which is uploading to youtube with the questions.
- Your partner's composition with the ten sentences.
- The farewell.
- Creative Commons License.

Don´t forget you to embed your presentation in a new post in kidblog.
Tags for the Kidblog:
- colsangregorio
- RedXXI
- Year 5
- English
- My first presentation.
After send to your teacher the URL's post to EDMODO by assignment.
domingo, 19 de octubre de 2014
RESOLVIENDO CONFLICTOS.
La tutoría de hoy 6 de Octubre queremos dedicarla a comentar y trabajar cómo resolver los conflictos y problemas que nos surgen en nuestra vida.
Quizás lo primero de todo es plantearnos la pregunta: ¿Qué es un conflicto? Para ello lo vamos a hacer a través de una RUTINA DE PENSAMIENTO: THINK - PAIR - SHARE

Veremos el siguiente vídeo: EL PUENTE. A partir del mismo durante un minuto pensaremos cuál podría ser tú definición de conflicto. Después lo comentarás con tu compañero y al final trataremos de crear una definición entre todos.
Después de generar nuestra definición recurrimos a al diccionario de la RAE para ver cuál es la definición de CONFLICTO.
Podemos dialogar un poco sobre vuestros casos personales:
- ¿Qué conflictos tienes en tu día a día?
- ¿Con quién tienes más conflictos?
- ¿Actúas de alguna manera concreta para resolverlos?
En el siguiente vídeo podemos ver diferentes consejos para trabajar a la hora de solucionar los conflictos que se os irán planteando a lo largo de vuestra vida. Durante el vídeo tendrás que dar significado a estas siglas POPLA.
Para trabajar el vídeo lo haremos con una RUTINA DE PENSAMIENTO: HOT WORDS. Es decir, de todo lo que veáis elegirás cuatro palabras que puedan resumir el vídeo, aquellas palabras que consideres que representen más lo que el vídeo nos muestra.
¿Te animas a poner en práctica el POPLA en tu día a día?
Suscribirse a:
Entradas (Atom)